Here are some illustrated examples of how Splashtop Classroom works once you have it set up. If you don't have Splashtop Classroom yet, you can get started with a free trial.
The Splashtop Classroom teacher experience info below includes:
How to start a Splashtop Classroom sharing session from your Computer
How to start a Splashtop Classroom sharing session from your iPad
How to start a Splashtop Classroom sharing session from your Android device
Splashtop Classroom allows teachers to share their desktop and applications. Once connected, students can view, control and annotate over lesson content directly from their own devices. Splashtop Classroom is perfect for teachers and instructors who want to engage the entire room!
How to start a Splashtop Classroom sharing session from your Computer
Run the Splashtop Streamer or click the Splashtop Streamer icon to open it. On Windows, the icon is located in the Windows tray in the lower right corner of the screen. You may have to click the up arrow icon near the lower left corner of the screen to find it among additional icons.
When the streamer opens, click the “Sharing” tab along the left side.

Adjust any settings you would like for the session and click the Start Sharing button.
This will display the session manager.
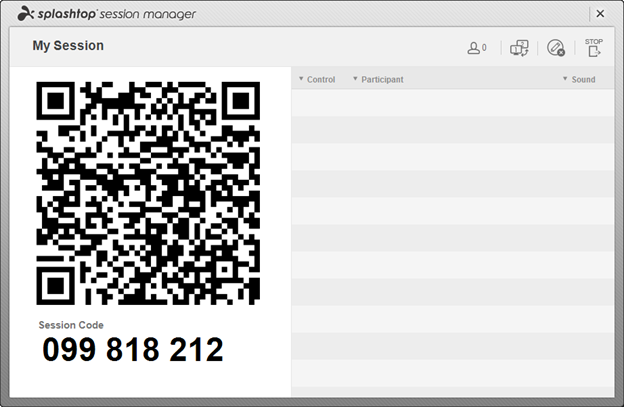
Students can now join in by scanning the QR code on your screen (or the screen you are projecting to), or they can enter the nine digit Session Code into the Splashtop app on their devices.
How to start a Splashtop Classroom sharing session from your iPad
(If you don’t have the Splashtop Classroom app installed, you can get it from the App Store by searching for Splashtop Classroom)
The app is available for iPads. iPhones are not supported.
Click the “Splashtop Classroom” icon

Click Teacher (or swipe in that direction)

On the Host a Session screen, log in with the Splashtop account that you use for Splashtop Classroom on the computer and online. You may be asked to authenticate your email (click a link in your email) to ensure security.

Tap the teacher computer you want to access and click the button for the session type you would like to start.
“Host a Shared Session” starts a new screen sharing session from your computer (out to students) while your iPad displays the computer screen content (that you can annotate) and controls the computer
“Connect 1 to 1” starts a session with your iPad controlling the computer but does not turn on screen sharing with students
“Join as host” will appear if you already have a sharing session running on the computer. Joining as host from your iPad will let you view, control and annotate the computer screen from your iPad.

Your iPad will display the content that is shown on your computer’s screen. You will be able to control the computer from your iPad using various finger gestures. You will also be able to record the device screen, annotate the screen (and the annotations will appear on your computer and projector if you are projecting) as well as being able to take snapshots of the screen (which will be saved to a folder on your computer desktop).
How to start a Splashtop Classroom sharing session from your Android device
(If you don’t have the Splashtop Classroom app installed, you can get it from the Google Play Store by searching for Splashtop Classroom)
The app is available for Android phones and tablets.
Click the “Splashtop Classroom” icon

Note: The screenshots in this section are from an Android phone.
Click Teacher (or swipe in that direction)

On the Host a Session screen, log in with the Splashtop account that you use for Splashtop Classroom on the computer and online. You may be asked to authenticate your email (click a link in your email) to ensure security.
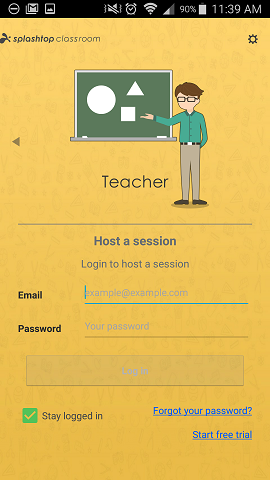
Tap the teacher computer you want to access and click the button for the session type you would like to start.
“Host a Shared Session” starts a new screen sharing session from your computer (out to students) while your Android device displays the computer screen content (that you can annotate) and controls the computer
“Connect 1 to 1” starts a session with your Android device controlling the computer but does not turn on screen sharing with students
“Join as host” will appear if you already have a sharing session running on the computer. Joining as host from your Android will let you view and control the computer screen from your device.

Your Android device will display the content that is shown on your computer’s screen. You will be able to control the computer from your Android device using various finger gestures. You will also be able to annotate the screen (and the annotations will appear on your computer and projector if you are projecting) as well as being able to take snapshots of the screen (which will be saved to a folder on your computer desktop).
How to use gestures and annotation controls during a Splashtop Classroom screen sharing session
You can use these two-finger gestures to navigate and control the toolbar

As well as these other finger gestures.

There are multiple tools available in the toolbar at the top of the screen. These are the controls available on the iPad version.

Below are the controls available in the toolbar on the Android version.
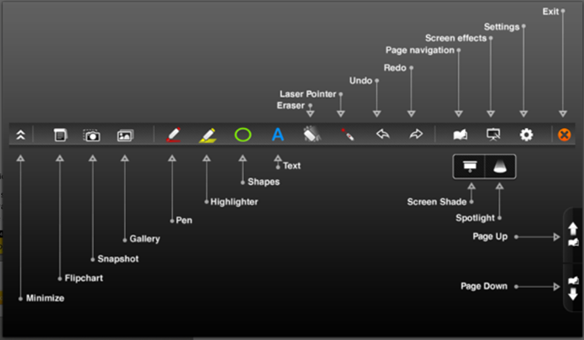
There is also a small menu in the lower right corner of the screen where you can access additional menu items and open/close the keyboard and annotation toolbar.

When you click the first button top open the additional items on the bottom toolbar, the items will differ slightly depending on whether you are using an iPad or Android device.

Items on this menu include X to disconnect the session, ? for a reminder of the standard finger gestures, REC for screen recording (iPad only), lock/circle for locking the screen orientation, 1->2 to switch screens if you use multiple computer monitors, virtual trackpad and mouse settings, on-screen arrow controls (iPad) and sound/mute (Android).
How to give screen control to a student
In the Session Manager, click the “Control” dot next to the student’s name. This will give the selected student the ability to control and annotate. The control dot and student’s name will be highlighted in orange to indicate that they have control. To take back control, click the dot again.

If you are running the session from an iPad or Android tablet, click the person icon to open the list of participants (on the right side of the screen). You can similarly select a participant and give control there.
See an example of Splashtop Classroom in action in this video:
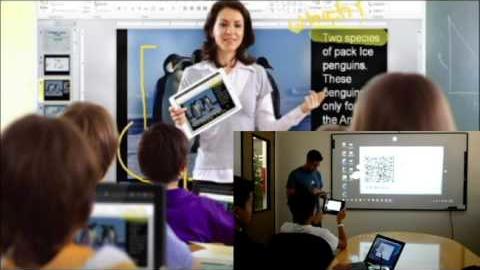
Make your classroom interactive with Splashtop Classroom
In this article, we've seen how to start sharing and annotating your computer screen with Splashtop Classroom.
Splashtop Classroom works with Windows and Mac computers and you can control and annotate from an iPad or Android device (Android phone or tablet).
Learn more about Splashtop Classroom and get a free trial
Or continue on to the next tutorial post: Splashtop Classroom - How it Works for Students


